[Tutorial] Recasar controladora del Blu-ray a Ps3

Moderadores: Kravenbcn, largeroliker, fidelcastro, cerealkiller, pspCaracas, dark_sasuke, m0skit0, LnD, ka69, zacky06, driKton

Responder
Avatar de Usuario
zacky06
Moderador Global
Moderador Global
Mensajes: 1696
Registrado: 12 Jul 2010, 15:28
PSN ID: zakarias09
Steam ID: Zacky06
Contactar:

[Tutorial] Recasar controladora del Blu-ray a Ps3

Mensaje por zacky06 »

Este tutorial es el que ha hecho el usuario de los foros de eol Klurosu

Lo primero es tener una ps3 con FW igual o inferior a 3.55
Tened cuidado ya que esto no esta probado al 100% en PS3 Slim

Downgradear la ps3:

Lo primero es downgradear la PS3 al Firmware Oficial 2.30 (de momento) o al Firmware base de la consola.
Para saber cual es el Firmware base de la consola, hay que modificar el último PS3UPDAT.PUP que haya salido y cambiar la versión por 0.00** (al actualizar nos mostrará la versión base de la consola)

Ya con el Firmware Oficial v2.30 instalado y funcionando normalmente, configuramos la hora, fecha, idioma y demás ajustes.


Segundo:
Con un dongle, iniciamos la PS3 en modo "Service/Factory Mode"
Metemos los archivos filtrados por hackerpointer en un pendrive (en FAT 32).
Borramos todo el contenido del archivo standalone.cfg y pegamos el del spoiler.
Spoiler:
###############################################
# Diag configuration file
# Amount of trial
# WLAN & BT RSSI measurement
#
# 2006/09/06 kyoshida
# Eurus for detecting the presence of
# 2006/10/10 kyoshida
# RSSI value standards
# "Inspection Guidelines for Adjustment: 06.10.05" to match.
###############################################
#=== Common Settings =========================
#
# Set the measurement mode
#
# 0 = line testing Hisashi Tooru
# 1 = debugging repeated measurements
#----------------------------------------------
0
#=== Common Settings =========================
#
# RSSI in the case of the standards, shutdown or run? Setting
#
# 0 = shutdown does not.
# 1 = shutdown that.
#----------------------------------------------
1
#=== Common Settings =========================
#
# ? shutdown = ? 00 only if
#
# RSSI within the standards (-OK-) to take if the LED control
#
# LED ID
#
# 1 = POWER (green)
# 2 = STATUS (red)
#
# LED ACTION
#
# 0 = OFF
# 1 = ON
# 2 = BLINK FAST
# 3 = BLINK SLOW
#----------------------------------------------
# <1 >------
# LED ID
1
# LED ACTION
1
# <2 >------
# LED ID
2
# LED ACTION
0
#=== Common Settings =========================
#
# ? shutdown = ? 00 only if
#
# Nonconforming RSSI (-NG-) to take if the LED control
#
# LED ID
#
# 1 = POWER (green)
# 2 = STATUS (red)
#
# LED ACTION
#
# 0 = OFF
# 1 = ON
# 2 = BLINK FAST
# 3 = BLINK SLOW
#----------------------------------------------
# <1 >------
# LED ID
1
# LED ACTION
2
# <2 >------
# LED ID
2
# LED ACTION
0
#=== WLAN Settings ===============================
#
# <10 binary input>
#
# RSSI measurements do? Setting
#
# 0 = not measured.
# 1 = measure.
# 2 = HW config is measured only by Eurus Yes.
#
# RSSI standard
#
# Min [dBm]
# Max [dBm]
#
# OK count
# NG count
#
# Estimated measurement period
# Number of measurement channels] × 100msec
#----------------------------------------------
# <ANTENNA A>
0
-80
-20
2
200
# <ANTENNA B>
0
-80
-20
2
200
# <ANTENNA DIVERSITY>
0
-80
-20
2
200
#=== WLAN Settings ===============================
#
# <10 binary input>
#
# RSSI measurement channel settings
# 1 - Specify 13
#
# Channel <14 = measured.
# Channel> 13 = not measured. (255)
#
#----------------------------------------------
# 1 - 13ch to measure if any
1
2
3
4
5
06
07
08
09
10
11
12
13
###############################################
# Samples
# 1 and 13ch only when measuring
##############################################
# 1
# 13
# 77
# 77
# 77
# 77
# 77
# 77
# 77
# 77
# 77
# 77
# 77
# END-samples ----------------------------------
# === AP test set connections between ====================
#
# RSSI measurements do? Setting
#
# 0 = not measured.
# 1 = measure.
# 2 = HW config is measured only by Eurus Yes.
#
# OK count
# NG count
#
# Check the connection standard of the period
# 100msec
#
# <AP>
# SSID
# IP ADDRESS
#
# <COOKIE>
# IP ADDRESS
# NETMASK
# DEFAULT ROUTE
# PRIMARY DNS
#
#----------------------------------------------
0
10
300
# <AP>
LV2DIAG-AP
192.168.1.1
# <COOKIE>
192.168.1.100
255.255.255.0
192.168.1.1
192.168.1.1
#=== BT Set =================================
#
# <10 binary input>
#
# RSSI measurements do? Setting
#
# 0 = not measured.
# 1 = measure.
#
# RSSI standard
#
# Min [dBm]
# Max [dBm]
#
# OK count
# NG count
#
# Estimated measurement period
# 100msec
#----------------------------------------------
# <ANTENNA 1>
0
-60
-1
2
300
# <ANTENNA 2>
0
-60
-1
2
30
# <ANTENNA DIVERSITY>
0
-60
-1
2
30
#==== CS Only ================================
#
# When removing the controller LED lighting pattern
#
# LED ID
#
# 1 = POWER (green)
# 2 = STATUS (red)
#
# LED ACTION
#
# 0 = OFF
# 1 = ON
# 2 = BLINK FAST
# 3 = BLINK SLOW
#--------------------------------------------
# <1 >------
# LED ID
1
# LED ACTION
2
# <2 >------
# LED ID
2
# LED ACTION
0
###############################################
#=== Execute the presence of other items ======
# WLAN, BT is executed after the test
#----------------------------------------------
# Drive Init
# 0 = do not perform
# 1 = run
#----------------------------------------------
0
#---------------------------------------------
# Install Systemsoftware
# 0 = do not perform
# 1 = run
#----------------------------------------------
1
#---------------------------------------------
# Freebdp
# 0 = do not perform
# 1 = run
#----------------------------------------------
0
#---------------------------------------------
# Install Systemsoftware Updater to use the name
#----------------------------------------------
manufacturing_updater_for_reset.self


Colocamos el pendrive en el USB derecho de la PS3 y encendemos la consola mediante cable de video EUROCONECTOR...

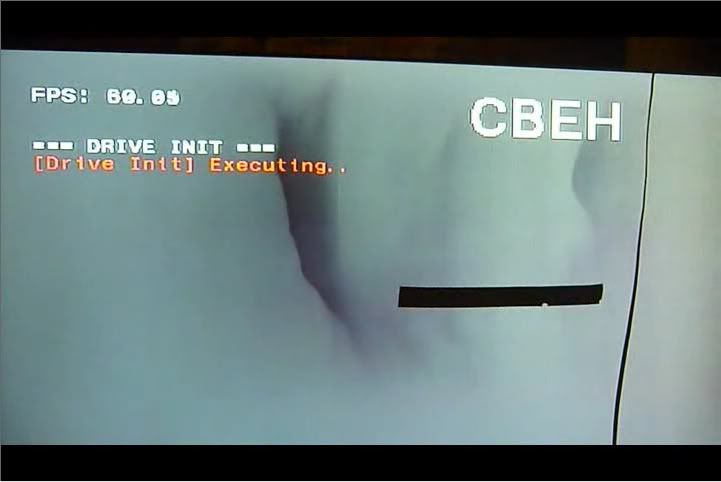
Se verá una pantalla gris con la siguiente frase en rojo: "[Drive Init] Executing..
Imagen

Cuando se grabe la key de la placa en la controladora saldrá en azul: "[Drive Init] PASS
Imagen

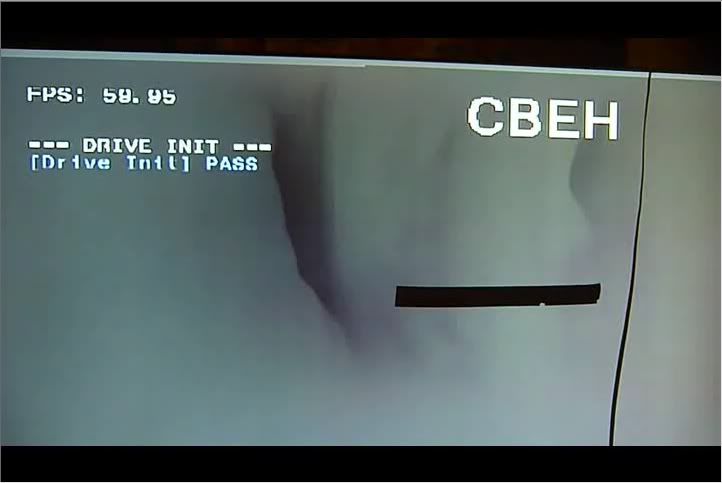
y la PS3 se apagará automáticamente.

Quitamos el pendrive con los archivos filtrados por hackerpointer...

...insertaremos un pendrive en el USB derecho con SOLO el lv2diag (file 2) y encendemos la PS3. De ese modo saldremos del modo "Service/Factory Mode" al estado normal del sistema.

A los 15 segundos la consola se apagará. Quitamos el pendrive y encendemos de nuevo la PS3.

En este video podras ver el proceso: http://www.youtube.com/watch?v=h5WLox6ba5o

Ahora actualizamos la consola al Firmware Oficial 3.55 desde la PS3 llendo a:
Ajustes-> Actualizacion del sistema-> Actualizar mediante un soporte de almacenamiento
Es necesario introducir un pendrive con el OFW 3.55 (dentro de las carpetas PS3->UPDATE)

Ya podemos instalar el Custom Firmware que queramos (desde recovery menu)

Archivos necesarios que deberán ir en la raiz, buscad por internet... estaban filtrados hace un par de años por un técnico del SAT de $ony apodado hackerpointer, podeis mirar por aquí y ver también la fecha aproximada de filtración.

NOTA del autor: Bueno, de aquí en adelante si os casca una controladora bluray o teneis dos ps3, una con el lector roto y la otra con la placa rota, podeis intercambiarlo y funcionaría el lector, ése es el verdadero lv2diag.self!, el que os muestra en pantalla todo, no se queda en negro y nos tiene esperando sin saber lo que sucede (el manufacturer_updater_for_reset.self).

Aquí dejo los md5 de cada archivo que se necesita

Código: Seleccionar todo

- Lv2diag.self MD5 C48E5EBFC00ABD89094CB73A2B0BEA59
- MD5 90168C03B217CE775A7839D87BBFF2A3 manufacturing_updater_for_reset
- fdm_spu_module.self MD5 9BDE16660221042A4440ED2C053A139E
- PS3UPDAT.PUP
cfg (carpeta) -> standalone.cfg standalone.cfg
Imagen

Mis Consolas:
Ps2 Phat v9 + Modchip Matrix Infinity 1.99 & Ps2 Phat v3
Psp Phat White 1004 5.00M33-6 Psp 2004 Slim Black Piano 6.60 ME 1.3 Psp Go 6.60 LME 1.8
Ps3 Slim 320Gb OFW 4.30 - CFW Rebug 4.73.1 REX Cobra 7.03
Ps3 Slim 500Gb OFW 4.75

cesarfrdz
Novato
Novato
Mensajes: 2
Registrado: 01 Abr 2011, 23:19
PSN ID: cesarfrdz

Re: [Tutorial] Recasar controladora del Blu-ray a Ps3

Mensaje por cesarfrdz »

muy bien tio exelente tuto pero unas preguntillas, si o si necesito el cable euroconector? porque? el archivo lv2diag FILE 2 donde esta? me baje los archivos y son estos,

Lv2diag.self
¦--fdm_spu_module.self
¦--manufacturing_updater_for_reset.self
+---cfg
¦--standalone.cfg

cuales son los archivos que meto en el primer pendrive para recasar? y en el segundo pendrive cual?

Avatar de Usuario
El niño del mechero
Enteradillo
Enteradillo
Mensajes: 107
Registrado: 17 Feb 2010, 00:11

Re: [Tutorial] Recasar controladora del Blu-ray a Ps3

Mensaje por El niño del mechero »

Has mirado el video?
[youtube]http://www.youtube.com/watch?v=h5WLox6ba5o[/youtube]

cesarfrdz
Novato
Novato
Mensajes: 2
Registrado: 01 Abr 2011, 23:19
PSN ID: cesarfrdz

Re: [Tutorial] Recasar controladora del Blu-ray a Ps3

Mensaje por cesarfrdz »

si eh mirado pero el tema esta que no expecifica cuales son los archivos que van el las memorias externas, mi duda esta en el Lv2diag.self (file2) osea coloco en el primer pendrive y tambien en el segundo? osea asi me imagino que seria, x seria mi pendrive.

x
¦--Lv2diag.self
¦--fdm_spu_module.self
¦--manufacturing_updater_for_reset.self
+---cfg
¦--standalone.cfg

y en mi otro pendrive

x
¦--Lv2diag.self

me equivoco?

Responder